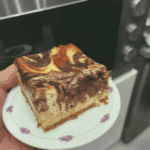
My little Henry has a serious sweet tooth—just like his mama! He’s also picked up my love for sneaking veggies into treats whenever possible. So, these No Bake Cheesecake Brownies are in constant rotation at our house. They’re decadent, chocolatey, and totally kid-approved (with a secret dose of healthy ingredients).

These brownies are ridiculously easy to whip up, no oven required! They’re also vegan and gluten-free, making them a perfect crowd-pleaser for all sorts of dietary needs. With a fudgy brownie base, a dreamy cheesecake layer, and a rich chocolate drizzle, they’re pure dessert magic.
Why You’ll Love These No Bake Cheesecake Brownies
These brownies aren’t just delicious; they’re packed with feel-good ingredients, so you don’t have to feel guilty about indulging. Here’s what makes them so special:
- Quick & Easy: No baking required! Just blend, chill, and enjoy. Perfect for busy weeknights or last-minute dessert cravings.
- Healthy Indulgence: Made with wholesome ingredients like dates, hazelnuts, and cashews, these brownies are a treat you can feel good about.
- Versatile: They’re vegan, gluten-free, and easily adaptable to other dietary needs. Everyone can enjoy a slice of heaven!
- Kid-Approved: Seriously, my picky eater Henry devours these. The rich chocolate flavor and creamy texture are a guaranteed win.

No Bake Cheesecake Brownies
- Total Time: 2 hours 25 mins
- Yield: 12 brownies
Description
Indulge in these decadent No Bake Cheesecake Brownies, a healthy and delicious treat perfect for any occasion. Packed with wholesome ingredients like dates, hazelnuts, and cashews, they’re quick, easy, and kid-approved.
Ingredients
- 1 cup medjool dates (pitted)
- 1 cup hazelnuts
- ¼ cup cocoa powder
- 1 tablespoon almond milk
- 1 cup raw cashews (soaked overnight or in hot water for 2 hours)
- ½ cup full-fat coconut milk
- ¼ cup maple syrup
- 2 tablespoons melted coconut oil
- 1 teaspoon vanilla extract
- ¼ teaspoon salt
- ½ dark chocolate bar
- 2 teaspoons coconut oil
Instructions
- Prepare the Brownie Base: Soak dates in hot water if needed, then drain and dry.
- Blend the Brownie Ingredients: Combine dates, hazelnuts, cocoa powder, and almond milk in a food processor until thick.
- Press the Brownie Base: Line a loaf pan with parchment paper and press the brownie mixture evenly into it.
- Prepare the Cheesecake Layer: Blend soaked cashews, coconut milk, maple syrup, coconut oil, vanilla extract, and salt until smooth.
- Layer and Freeze: Pour cheesecake mixture over the brownie base and freeze for at least 2 hours.
- Make the Chocolate Drizzle: Melt dark chocolate and coconut oil in a microwave.
- Drizzle and Slice: Remove brownies from freezer, drizzle with melted chocolate, lift from pan, and slice.
Notes
For a richer flavor, toast the hazelnuts before adding them to the brownie base. If using a smaller pan, adjust the baking time as needed, checking for doneness with a toothpick. These brownies are best enjoyed within a few days but can be frozen for longer storage.
- Prep Time: 20 mins
- Cook Time: 5 mins
- Category: Dessert
- Method: No-Bake
- Cuisine: American
Ingredient Lowdown

Here’s what you’ll need to make these magical No Bake Cheesecake Brownies. Don’t be intimidated by the ingredient list—it’s all simple stuff!
Brownie Layer:
- 1 cup medjool dates (pitted)
- 1 cup hazelnuts
- ¼ cup cocoa powder
- 1 tablespoon almond milk
Cheesecake Layer:
- 1 cup raw cashews (soaked overnight or in hot water for 2 hours)
- ½ cup full-fat coconut milk
- ¼ cup maple syrup
- 2 tablespoons melted coconut oil
- 1 teaspoon vanilla extract
- ¼ teaspoon salt
Chocolate Drizzle:
- ½ dark chocolate bar
- 2 teaspoons coconut oil
Step-by-Step Instructions
Let’s dive into creating these decadent brownies. These instructions are simple and easy to follow, even for beginner bakers.
Step 1: Prepare the Brownie Base
If your dates aren’t soft, soak them in hot water for about 10 minutes. Drain them well and pat them dry to remove excess moisture. This will help them blend into a smooth, fudgy base.
Step 2: Blend the Brownie Ingredients
Combine the dates, hazelnuts, cocoa powder, and almond milk in your food processor. Pulse until the mixture forms a thick, brownie-like consistency. You might need to scrape down the sides a few times to ensure everything is evenly mixed.
Step 3: Press the Brownie Base
Line a loaf pan (8×4 inches works great!) with parchment paper, leaving some overhang on the sides for easy removal later. Transfer the brownie mixture into the prepared pan and press it down firmly to create an even layer. A flat spatula or the back of a spoon can be helpful for this.
Step 4: Prepare the Cheesecake Layer
Drain and rinse the soaked cashews thoroughly. Combine them with the coconut milk, maple syrup, melted coconut oil, vanilla extract, and salt in your high-speed blender or food processor. Blend until the mixture is completely smooth and creamy. Be patient; this might take a few minutes.
Step 5: Layer and Freeze
Pour the cheesecake mixture over the brownie base, spreading it evenly. Place the entire pan in the freezer for at least 2 hours, or until the cheesecake layer is firm.
Step 6: Make the Chocolate Drizzle
In a microwave-safe bowl, combine the dark chocolate bar and coconut oil. Microwave in 20-second intervals, stirring between each, until the chocolate is completely melted and smooth.
Step 7: Drizzle and Slice
Remove the brownie pan from the freezer. Pour the melted chocolate over the cheesecake layer, letting it drizzle and swirl naturally. Lift the entire block of brownies out of the pan using the parchment paper overhang. Slice into squares and enjoy!
Pro Tips

Want to take your No Bake Cheesecake Brownies to the next level? Try these tips:
- For extra-fudgy brownies, add a pinch of salt to the brownie layer. It enhances the chocolate flavor beautifully.
- Don’t over-process the brownie base. A slightly chunky texture is perfect.
- If you’re short on time, you can skip the chocolate drizzle and top with fresh berries or a dollop of coconut whipped cream. Or check out our tips for a fast dessert.
- For a cleaner cut, use a hot knife. Dip your knife in hot water, wipe it dry, and slice through the brownies. Repeat between each slice.
Switch-Ups & Swaps
Get creative and customize your brownies! Here are some fun variations:
- Nut-Free: Swap the hazelnuts for sunflower seeds or rolled oats for the brownie base.
- Peanut Butter Dream: Add a swirl of peanut butter to the cheesecake layer or drizzle melted peanut butter on top.
- Minty Fresh: Add a drop or two of peppermint extract to the cheesecake layer for a refreshing twist. Check our Lunch recipes for more ideas using mint.
- Coffee Kick: Add a teaspoon of instant coffee granules to the brownie base for a mocha flavor.
How long do these brownies last?
Store them in an airtight container in the freezer for up to 2 weeks. Thaw for about 10 minutes before serving.
Can I use other nuts for the brownie base?
Absolutely! Walnuts, pecans, or almonds would all work well. Just be sure to toast them briefly for the best flavor.
Are these brownies truly vegan?
Yes! This recipe uses only plant-based ingredients, making it suitable for vegans.
Can I make these without a food processor?
While a food processor is recommended for the smoothest results, you can try using a high-powered blender. You might need to stop and scrape down the sides more frequently.
Serving Suggestions

These brownies are perfect on their own, but here are some ideas to make them extra special:
- Serve them slightly chilled with a scoop of your favorite vegan ice cream. Breakfast sundaes can be fun too.
- A dollop of coconut whipped cream and a sprinkle of chopped nuts add a touch of elegance.
- Fresh berries complement the rich chocolate flavor beautifully.
- For a warm treat, gently heat the brownies in the microwave for a few seconds. The chocolate drizzle will become gooey and irresistible.
That’s a Wrap
So, there you have it – a delicious and healthy No Bake Cheesecake Brownie recipe that’s sure to impress. It’s a perfect treat for any occasion, whether it’s a casual weeknight dessert or a special celebration. Give it a try and let me know what you think! I’m always excited to hear from you. For another delightful treat, give our Dinner recipes a look. Now, go forth and bake! Be sure to share your creations on social media, and don’t forget to tag me!

