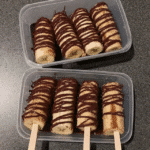
These Frozen Chocolate Covered Banana Pops are a delightful, simple treat, ideal for those hot summer days. Just a handful of ingredients and a little freezer magic transform ordinary bananas into a cool, creamy, and chocolatey sensation. Kids adore them, grown-ups crave them – they’re a winner for everyone!

One afternoon, while rummaging through the freezer, I found overripe bananas nearing their expiration date. Unwilling to let them go to waste, inspiration struck: Frozen Chocolate Covered Banana Pops! This treat marries the natural sweetness of bananas with the rich decadence of chocolate, all while being healthy and refreshing. An easy dessert recipe that is ready in under 30 minutes.
Why You’ll Love It
These Frozen Chocolate Covered Banana Pops aren’t just tasty; they’re practical too! Here’s why they’re a freezer staple:
- Quick & Easy: Just a few simple steps, perfect for busy weeknights or impromptu dessert cravings.
- Healthy Indulgence: A good source of potassium and fiber from the bananas, coated in a thin layer of chocolate—a guilt-free treat!
- Customizable: Endless possibilities! Swap milk chocolate for dark, add sprinkles, chopped nuts, or even a drizzle of white chocolate for a personal touch.
- Kid-Friendly: Little hands can help with dipping and decorating, making for a fun kitchen project.
- Perfect for Summer: Cool, refreshing, and the ideal way to beat the heat.

Frozen Chocolate Covered Banana Pops
- Total Time: 2 hours 40 mins
- Yield: 8 servings
Description
Cool off with these easy Frozen Chocolate Covered Banana Pops! They’re a healthier, customizable treat that’s perfect for hot days. With a creamy peanut butter layer and a crunchy chocolate shell, they’re a delightful indulgence for all ages.
Ingredients
- 4 ripe bananas
- ¾ cup chocolate chips
- 1 teaspoon coconut oil
- ⅓ cup peanut butter
- ¼ cup shredded coconut
Instructions
- Prep the Bananas: Peel bananas, slice in half, and insert popsicle sticks.
- Freeze the Bananas: Arrange pops on a parchment-lined sheet and freeze for 2 hours.
- Peanut Butter Magic: Spread peanut butter on frozen bananas and freeze for 30 minutes.
- Chocolate Coating: Melt chocolate chips and coconut oil in a microwave.
- Dip and Sprinkle: Dip bananas in chocolate, sprinkle with coconut, and freeze for 15 minutes.
- Enjoy!
Notes
For a richer flavor, use high-quality dark chocolate. To make the coconut extra toasty, bake it in a dry skillet over medium heat for a few minutes until lightly browned. If you’re short on time, you can skip the peanut butter layer, but it adds a delicious creamy element.
- Prep Time: 20 mins
- Cook Time: 5 mins
- Category: Dessert
- Method: No-Bake
- Cuisine: American
Ingredient Overview

Here’s what you’ll need to make these delightful pops:
- 4 ripe bananas: The riper, the sweeter!
- ¾ cup chocolate chips: Semi-sweet, milk chocolate, or dark chocolate—your choice!
- 1 teaspoon coconut oil: Helps the chocolate melt smoothly and gives it a nice sheen.
- ⅓ cup peanut butter: Smooth or crunchy, it’s up to you!
- ¼ cup shredded coconut: Adds a lovely tropical touch.
Remember, feel free to get creative and add other toppings like chopped nuts or sprinkles!
Step-by-Step Instructions
Step 1: Prep the Bananas
Peel the bananas and slice each in half. Gently push a popsicle stick into the cut end of each banana half.
Step 2: Freeze the Bananas
Arrange the banana pops on a parchment-lined baking sheet or plate and place them in the freezer for about 2 hours, or until completely frozen.
Step 3: Peanut Butter Coating
Spread a layer of peanut butter over each frozen banana pop. Try our peanut butter cookies if you love peanut butter. Return the pops to the freezer while you prepare the chocolate.
Step 4: Melt the Chocolate
Combine the chocolate chips and coconut oil in a microwave-safe bowl. Melt in 20-second intervals, stirring after each, until the chocolate is smooth and glossy.
Step 5: Chocolate Dip and Decorate
Dip each peanut butter-coated banana pop into the melted chocolate, ensuring it’s fully covered. Sprinkle with shredded coconut (or your chosen toppings). Return the pops to the parchment-lined baking sheet.
Step 6: Final Freeze
Freeze the pops for another 15-20 minutes, or until the chocolate is set. Enjoy!
Pro Tips

- Ripe Bananas are Key: Use bananas that are very ripe for the sweetest flavor. If your bananas are still green, let them ripen on the counter for a few days.
- Freezing is Essential: Ensure the bananas are fully frozen before dipping them in chocolate; this will prevent a messy meltdown!
- Coconut Oil Magic: Coconut oil not only helps the chocolate melt smoothly but also adds a glossy finish to your pops. If you don’t have coconut oil, you can substitute vegetable oil or shortening. See more dessert recipes.
- Parchment Paper Savior: Line your baking sheets with parchment paper for easy cleanup. The frozen pops won’t stick, and you’ll have less to wash later.
Recipe Variations
- Nutty Delight: Add chopped nuts like almonds, peanuts, or walnuts along with the shredded coconut.
- Sprinkle Fun: Colorful sprinkles add a festive touch, especially for birthdays or holidays.
- Double Chocolate Dip: Dip the pops in melted white chocolate after the dark chocolate sets, then drizzle the white chocolate over the top for extra decadence.
- Vegan Version: Use vegan chocolate chips and ensure your peanut butter is also vegan-friendly. Enjoy our vegan recipes for inspiration!
Can I use other nut butters besides peanut butter?
Absolutely! Almond butter, cashew butter, or even sunflower seed butter are all delicious alternatives.
How long can I store these Frozen Chocolate Covered Banana Pops?
These treats can be stored in the freezer for up to 2 months, tightly wrapped in plastic wrap or stored in a freezer-safe container.
What if I don’t have popsicle sticks?
No problem! You can use wooden skewers, small spoons, or even just forks.
Can I make these without coconut oil?
Yes, you can use vegetable oil or shortening instead of coconut oil. Just use a small amount, about 1 teaspoon, to help the chocolate melt smoothly.
Serving Suggestions

These Frozen Chocolate Covered Banana Pops are amazing on their own, but here are a few ideas to make them even more special:
- Sundae Topping: Crumble a few pops and sprinkle them over your favorite ice cream sundae.
- Party Platter: Arrange the pops on a platter with other frozen treats like fruit skewers and mini ice cream cones.
- Dessert Board: Include the pops on a dessert charcuterie board with fresh fruit, cookies, and other sweets.
- After-Dinner Treat: Serve them as a refreshing and light dessert after a meal. Consider checking out our dinner recipes for some ideas!
Final Thoughts
These Frozen Chocolate Covered Banana Pops are a delightful treat that’s both simple to make and incredibly satisfying. They’re the perfect way to use up ripe bananas, offering a healthy and customizable dessert option for all ages. Try these pops today and discover your new favorite summer dessert. For more delicious treats, check out our dessert recipes.
Share your creations with us! Follow Molly at Amazing Korean Food on Facebook, Instagram, and Pinterest.


