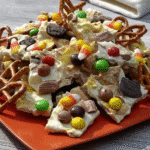
This Halloween Candy Bark is pure fun for the whole family! Last year, my kids and I made three batches—one for trick-or-treaters, one for our Halloween movie night, and one just for snacking. It’s that good. You’ll love how simple it is to combine melted vanilla bark with festive Halloween candies and treats.

The best part is, you can customize your bark with any candies your heart desires. This recipe is a fantastic starting point for creating a colorful and sweet treat. It’s the perfect way to add some spooky deliciousness to any Halloween gathering. You can even adapt it for other holidays and celebrations.
Why You’ll Love It
This Halloween Candy Bark isn’t just delicious; it’s a total blast to make! It’s a fantastic project for kids and adults alike, offering a chance to get creative in the kitchen. Plus, it’s a super-easy treat to share with friends and family, bringing some sweetness to your Halloween festivities.
Here’s a breakdown of what makes this bark so special:
- Quick & Easy: You only need a handful of ingredients and about 20 minutes to whip up a batch. Perfect for busy weeknights or last-minute party prep.
- Customizable: The sky’s the limit when it comes to adding your favorite candies. From spooky gummy worms to classic candy corn, make it your own.
- Festive & Fun: The vibrant colors and mix of textures make this bark a real showstopper. It’s the perfect centerpiece for any Halloween gathering.
- Kid-Friendly: Get the kids involved in the process! They’ll have a blast choosing their favorite candies and sprinkling them over the melted bark.
So grab your favorite Halloween candies and let’s make some bark!
Print
Halloween Candy Bark
- Total Time: 30 mins
- Yield: 12-15 servings
Description
A fun and festive Halloween treat, this candy bark is easy to make and perfect for sharing. Combine melted vanilla bark with your favorite Halloween candies and sprinkles for a spooky and delicious dessert. Customize it with any candies you like for a unique and personalized treat.
Ingredients
- 16 ounces vanilla candy bark (candy melts or white chocolate)
- 1 cup mini pretzel twists
- 10 chocolate sandwich cookies with orange filling
- 1 cup candy corn
- ¼ cup assorted sprinkles
- 1 cup additional candies of your choice
Instructions
- Prep the Baking Sheet and Candies: Line a baking sheet with parchment paper. Chop or break any larger candies into smaller pieces.
- Melt the Chocolate: Melt the vanilla candy bark according to package directions.
- First Layer: Pour half of the melted chocolate onto the baking sheet and spread evenly. Arrange pretzels, cookie pieces, and candy corn over the chocolate.
- Second Layer: Pour the remaining chocolate over the first layer. Sprinkle with sprinkles and additional candies.
- Cool and Break: Let the bark cool completely, then break into pieces.
Notes
For a glossy finish, add a teaspoon of shortening to the melted chocolate. If using white chocolate chips, temper the chocolate for best results. Get creative with the toppings! Try adding chopped nuts, dried fruit, or other festive candies. Store leftover bark in an airtight container at room temperature.
- Prep Time: 20 mins
- Cook Time: 10 mins
- Category: Dessert
- Method: No-Bake
- Cuisine: American
What You’ll Need

Here’s what you’ll need to create this Halloween Candy Bark masterpiece:
- 16 ounces vanilla candy bark (candy melts or white chocolate)
- 1 cup mini pretzel twists
- 10 chocolate sandwich cookies with orange filling
- 1 cup candy corn
- ¼ cup assorted sprinkles
- 1 cup additional candies of your choice (get creative!)
A Quick Note About Chocolate: While you can use any white chocolate or white chocolate bark for this recipe, I highly recommend using Ghirardelli Vanilla Melting Wafers. They have a delicious flavor and melt beautifully.
Feel free to experiment with different types of candy bark, such as milk chocolate or dark chocolate. Just keep in mind that the flavor combinations might change the overall taste of your bark.
From Start to Finish
Step 1: Prep the Baking Sheet and Candies
Line a baking sheet with parchment paper or a silicone baking mat. This will prevent the bark from sticking and make cleanup a breeze. Chop or break any larger candies, cookies, or pretzels into smaller, bite-sized pieces.
Step 2: Melt the Chocolate
Melt the vanilla candy bark (or white chocolate) according to the package directions. If you’re using the microwave, be sure to use 50% power to prevent overheating or scorching. I suggest heating in 30-second intervals, stirring until smooth between each heating.
Step 3: First Layer of Chocolate and Toppings
Pour about half of the melted chocolate onto the prepared baking sheet and spread it evenly to about 1/4 inch thickness. Work quickly while the chocolate is still melty, arranging an assortment of pretzels, cookie pieces, and candy corn (or other candies of your choice) in a single layer over the chocolate.
Step 4: Second Chocolate Layer and Sprinkles
Pour the remaining melted chocolate over the first layer of toppings. Sprinkle generously with assorted Halloween sprinkles and any additional candies you like.
Step 5: Cool and Break
Let the bark cool completely at room temperature. To speed up the cooling process, you can place the baking sheet in the freezer for about 10 minutes. Once the chocolate is firm, break the bark into irregular pieces.
Better-Than-Grandma Tips

- For a smooth, even layer of chocolate, use an offset spatula to spread the melted bark. It gives you greater control and helps avoid any air bubbles.
- Don’t overload the bark with toppings. While it’s tempting to pile on all the goodies, a single layer ensures that the bark holds together well. Want even more ideas? Check out our collection of delicious dessert recipes.
- If your chocolate starts to seize up or becomes too thick, add a teaspoon of coconut oil or shortening to help smooth it out.
Make It Your Way
- Festive Fall Bark: Use fall-themed candies like candy corn, pumpkin candies, and caramel bits. You can also try adding chopped pecans or walnuts for a nutty crunch.
- Christmas Candy Bark: Swap out Halloween candies for Christmas-colored M&Ms, crushed peppermint candies, and festive sprinkles. For a touch of elegance, add some dried cranberries or chopped pistachios. You can also try using dark chocolate or milk chocolate bark instead of white. Looking for inspiration? Try one of the amazing dinner recipes on the site.
- Birthday Party Bark: This recipe easily transforms into a celebratory treat for any birthday. Use colorful sprinkles, candies, and even edible glitter to match the party theme.
How do I make Halloween chocolate bark?
Making Halloween chocolate bark is incredibly easy! Simply melt your favorite chocolate, spread it on a baking sheet, add your spooky toppings, and let it cool. That’s all it takes to create a delicious and festive treat.
Why is candy called bark?
Candy bark gets its name from its resemblance to tree bark. Once the chocolate sets and breaks into irregular pieces, it looks like the rough surface of a tree’s bark.
What is the most disliked Halloween candy in America?
While candy preferences vary, some surveys suggest that candy corn is the most disliked Halloween candy in America, even though others enjoy it! It really comes down to personal preference.
Is candy coating the same as bark?
Candy coating, also known as candy melts, is a type of confectionery coating often used for making bark. It’s similar to chocolate but contains other vegetable fats instead of cocoa butter. It melts smoothly and sets quickly, making it ideal for bark-making.
Pairs & Plates

This Halloween Candy Bark is delicious all on its own. Try serving it up with a steaming mug of hot chocolate or apple cider for a cozy Halloween night in. You can also serve it in small treat bags for guests or trick-or-treaters. It’s perfect for Halloween parties, movie nights, or simply enjoying as an after-dinner treat. Check out our Halloween Candy Corn Cookies recipe for another fun and festive treat!
Before You Go
This Halloween Candy Bark is the perfect recipe to bring some festive cheer to your spooky celebrations! It’s easy, fun, and endlessly adaptable. So gather your favorite candies, get creative in the kitchen, and enjoy the sweet taste of Halloween. I’d love to see your creations! Share your photos with me on social media:
Now, go bake up some spooky sweetness with our latest recipe for Chocolate Chip Cookies!


